Database System Administrator
For UNIX installations, the database system administrator or "dbsa" is the user who as super user installed VERSANT on each machine in a network. There is only one database system administrator for a system of VERSANT installations.
The dbsa:
Owns the osc-dbid
file for a database system;
Owns all VERSANT software root directories, including the bin
, h
, and lib
subdirectories and all files under those directories, for all installations in a network; this ownership extends to all versions of VERSANT installed on a system of databases;
Owns all system information files for all installations in a network;
Owns all database root directories for all installations in a network.
Database Administrator dba
For all installations and operating systems, the database administrator or "dba" of a database is the user who has used the makedb
and createdb
utilities to create that database. There can be any number of database administrators in a VERSANT system of distributed databases.
The dba owns the database and related files and directories.
After a database has been created, you can change its database administrator by changing the ownership of its database directory.
The database administrator has access to the database even if the dba name is not in the database user list.
Database User List dbuser
For all installations and operating systems, the "database user list" is a VERSANT maintained list of users who have access to a particular database.
The database user list for a particular database can be created and maintained only by the dba for that database.
Each database has only one database user list. There may be a different database user list defined for each of the many databases in a network.
The members of the database user list can connect to and use a particular database and can excecute utilities to get information about a database system.
Root User root
For UNIX installations, a root user is the user with operating system root privileges for a particular machine in a network.
Being a root user with privileges deriving from operating system permissions provides only minimal privileges with respect to VERSANT. There is no reason to use VERSANT as root user.
Example
For example, on a UNIX system, if the database root directory is /versant/db
and a database has been created using /versant/db/db1
as a database directory, then the dbsa is the user that owns /versant/db
and the dba for database db1
is the user who owns both /versant/db/db1
and the database volumes that comprise the database.
dbsa |
dba |
db
user |
Remote
Execution |
|
addvol
|
no | yes | no | yes |
comparedb
|
no | yes | no | yes |
compardb (pc)
|
no | yes | no | yes |
convertdb
|
no | yes | no | no |
cnvrtdb (pc)
|
no | yes | no | no |
createdb
|
no | yes | no | yes |
createreplica
|
no | yes | no | yes |
creatrep (pc)
|
no | yes | no | yes |
db2tty
|
no | yes | yes | yes |
dbid
|
yes | yes | yes | yes |
dbinfo
|
no | yes | no | yes |
dblist
|
yes | yes | yes | yes |
dbtool
|
no | yes | no | no |
dbuser
|
no | yes | no | yes |
dropclass
|
no | yes | yes | yes |
dropcls (pc)
|
no | yes | yes | yes |
dropinst
|
no | yes | yes | yes |
ftstool
|
no | yes | yes | yes |
makedb
|
no | yes | no | yes |
makeprofile
|
no | yes | no | yes |
makeprof (pc)
|
no | yes | no | yes |
oscp
|
no | yes | yes | yes |
polling
|
no | yes | yes | yes |
rebilink
|
no | yes | yes | yes |
removedb
|
no | yes | no | yes |
removereplica
|
no | yes | no | yes |
removrep (pc)
|
no | yes | no | yes |
reorgdb
|
no | yes | no | no |
sch2db
|
no | yes | yes | yes |
setdbid
|
no | yes | yes | yes |
startdb
|
no | yes | no | yes |
stopdb
|
no | yes | no | yes |
stopfe
|
no | yes | yes | no |
vbackup
|
no | yes | no | yes |
vcopydb
|
no | yes | no | yes |
verr
|
no | yes | yes | no |
verrindx
|
no | no | no | no |
vexport
|
no | yes | yes | yes |
vgc2
|
no | yes | yes | yes |
vimport
|
no | yes | yes | yes |
|
no |
yes |
yes |
yes |
x.y.z.p
where
x
is the major release number
y
is the minor release number
z
is the update release number and
p
is the patch release number.
-l
option. For example, if you want to know the patch release number of the oscp
utility, type
oscp l
addvol parameters [options] dbname
Increase storage capacity by creating and adding a volume to the database dbname
with the name and path specified as parameters substituted for parameters
and with the options substituted for options
.
For a remote database, append the node name to the database name using the syntax database@node
.
The size of a database volume is limited only by your hardware.
The maximum number of database volumes that can be used for storage of data is theoretically unlimited.
Mandatory parameters are:
-n volName
For example:
-n volume2
-p volPath
You may specify the path in relative or absolute terms. You can specify either a file volume or a raw device.
For example:
-p volume2
datavol
entry in the server profile. See datavol
in the "Database Profiles" chapter.
-s volSize
The default size is 4 megabytes. Indicate kilobytes with k or K and megabytes with m or M.
For example:
-s 1M
-s 1024k
addvol
will look in the database server profile file for a datavol
entry with the specified volume name. If a datavol
entry for the volume name does not exist and no size has been specified on the command line, the default size will be used.
-e extentsize
profile.be
.For example:
-e 4
-i
-i
parameter is ignored if you specified a raw device for the volume.
-noprint
The new volume will be registered in the database, but the server process profile profile.be
will not be changed.
The new space will be available immediately after the addvol
utility finishes. The additional storage space will be available to all classes in the database as classes can span volumes. The volume added will augment the system volume but have no effect on the capacity of the logical or physical log volumes.
There is no corresponding command to delete a volume. To shrink the space allocated to a database, use the reorgdb
utility.
The minimum size of a database volume depends upon the setting for extent_size
specified in the server process profile profile.be
. See also the sysvol
and extent_size
parameters.
If you run out of database space, or if database recovery fails for lack of space, you will see:
error 1083, SM_E_OUT_OF_VOL_SPACE: all volumes exhausted.
UNIX notes
A database on UNIX can use either files or raw devices for the database volumes. If you are using files, they may be local or remote.
If the database volumes are remote UNIX files, they may be accessed through NFS. However, we strongly discourage you from accessing database files through NFS, because the NFS protocol does not guarantee that file writes are flushed to disk on invocation of a flush system call. This means that use of NFS could result in database corruption!
db@host
protocol rather than with NFS protocol. This allows a VERSANT server process to directly access the database files and will improve performance.
0
or cylinder 1
. When a UNIX partition is used for a raw device, all cylinders allocated to that partition will be used.
If the UNIX partition is located on 'a
' or 'c
' ('c
' implies the entire disk), the disk label can be overwritten.
a
' two cylinders long and then start partition 'b
' at cylinder 2
. You can then safely use partition 'b
' for raw devices.
In order to create database volumes on UNIX raw devices, you must make the person who will create the database the owner of the device, and give the database owner read-write permissions.
See also the chapter "Create a Database."
cleanbe
system utility runs itself periodically to clean up unused resources.
Do not invoke this utility explicitly. It is only documented here because of its visible presence in the VERSANT bin
directory.
cleanfe
system utility runs itself periodically to clean up unused resources.
Do not invoke this utility explicitly. It is only documented here because of its visible presence in the VERSANT bin
directory.
UNIX comparedb [options] db1 db2
PC compardb [options] db1 db2
Count the objects in the databases specified as db1
and db2
, confirm that the logical object identifiers for the objects in the databases are the same, and display the logical object identifiers for the first object that is different.
Options are:
-value
-noprint
Before using comparedb
, you must use the dbinfo
utility to set both databases to single user mode in order to compare stable database states.
The second comparison database, db2
, must be a group database.
You can call comparedb
from a program by using the C/VERSANT o_utility()
function or the C++/VERSANT utility()
method and specifying the parameter O_UT_COMPAREDB
.
UNIX convertdb database_name
PC cnvrtdb database_name
Convert an existing database created with a prior VERSANT Release to work with the current VERSANT Release and return an error if not successful.
You must end all long transactions and then stop the database with stopdb
before and after converting it. Do not stop the database with the -f
option to stopdb
.
After a database has been converted to the current Release format, you still can access it with applications written for prior releases by following the instructions in your Release Package related to release compatibility.
If the database contains bilink or bilink vstr objects created with cfront 2.1, you will need to run the rebilink
utility after running the convertdb
utility.
createdb [options] dbname
Create, format, and initialize a new database with the name dbname
and either make the new database a part of an existing distributed database system or start a new database system.
Options that may be specified in the options
parameter are:
-i
Reserving space can prevent you from running out of space at runtime. For example, suppose you set the size of the system volume as 100 megabytes in your profile, but you really have only 60 megabytes physically available. In this case, if you use -i
, you will immediately get an out-of-space error, but if you do not use -i
, you will get an error at runtime as the system volume dynamically expands.
If you have defined multiple storage volumes and the physical space in one volume is less than the logical space, you will get an out-space-error at runtime even though there is space available in the next volume.
Pre-allocating space may improve performance, because space will not have to be dynamically allocated. However, pre-allocating space will slow down the process of creating the database, and because the space is used immediately, it will prevent it from being used for other purposes.
The -i
option has no effect on UNIX raw devices.
Space for log volumes is always pre-allocated according to the parameters set for the plogvol
and llogvol
size specifications.
-noprint
dbname
must be unique for the distributed database system to which it will belong.You must be the owner of the database (the database administrator) or the super user to run this utility.
For a remote database, append the node name to the database name using the syntax database@node
.
This utility will create the system, physical log, and logical log volumes using either values found in the server process profile and else default values.
If the server profile contains datavol
entries for data volumes, then these volumes will also be created. See datavol
in the "Database Profiles" chapter and addvol
in this chapter for more information on data volumes.
If the -i
option is specified, both the system volume and any data volumes created will be initialized.
The createdb
utility will update the osc-dbid
file to register the new database with the existing distributed database system. The file osc-dbid
containing the path and name of all databases in the system must be visible from your machine when you run createdb
.
Examples of using createdb
:
createdb mydb
createdb -i mydb
Key components of the newly created database will be:
System volume
profile.be
.
The default is a file of 10
megabytes named system
located under the database directory.
For example, for Release 5.2.1 on Sun, and a database named dbname
:
/usr/local/versant/5.2.1/sun4/db/dbname/system
profile.be
.
The default is a file of 2
megabytes named physical.log
located under the database directory.
For example, for Release 5.2.1 on Sun, and a database named dbname
:
/usr/local/versant/5.2.1/sun4/db/dbname/physical.log
profile.be
.
The default is a file of 2
megabytes named logical.log
located under the database directory.
For example, for Release 5.2.1 on Sun, and a database named dbname
:
/usr/local/versant/5.2.1/sun4/db/dbname/logical.log
.sharemem
UNIX createreplica [options] primary_db replica_db
PC creatrep [options] primary_db replica_db
Create or designate a replica database and then load the replica database with the contents of a primary database.
Command elements are:
options
createreplica
.
primary_db
db@node
syntax to specify a remote database.The primary database must be a group database.
replica_db
replica_db@node
syntax to specify a remote database.The replica database must be a group database.
-i
If you specify -i, then, before running this utility, you must create the database directory and support files by running makedb
.
If the replica database already exists, you will get the error UT_DB_EXISTS
.
-nocreate
If you specify -nocreate
, then, before running this utility, you must have previoiusly created the target database.
An error will be returned if:
The target database does not exist.
The user does not have write access to the target database.
The target database does not have enough space allocated to it to contain all objects in the origin database.
The target database already contains user class definitions or objects. In this case, the error raised with be UT_DB_NOT_EMPTY
.
-noprint
stopdb
.You must use this utility before beginning replication with the Fault Tolerant Server option.
Before running this utility, you must first create a text file named replica
in your software root directory (the directory specified by the VERSANT_ROOT
parameter) and add a line of the following form:
primary_db@node1 replica_db@node2
If, at runtime, this utility does not find the text file named replica and/or does not find an entry for the primary database, then this utility will fail.
Both replica databases must be group databases.
You can only create one replica for a database.
The createreplica
utility will create storage and log volumes and update the network database identifier file osc-dbid
to register the new database as part of the current database system.
For createreplica
to update the osc-dbid
file, the osc-dbid
file must be accessible from your machine at the time you run createreplica
. If you do not know the location of the osc-dbid
file for the source database, you can use the oscp
utility to find it. If you have multiple database systems in your network, you may also want to confirm that your system configuration files or environment variables point to the correct osc-dbid
file. For further information on the oscp
utility and the osc-dbid
file, see the VERSANT Database Administration Manual.
You can call createreplica
from a program by using the C/VERSANT o_utility()
function or the C++/VERSANT utility()
method and specifying the parameter O_UT_CREATEREPLICA
.
The synchronous replication database created with createreplica
is a normal database like any other. This means that you can use normal database utilities with the synchronous replication database.
For example, if the synchronous replication database is not large enough to hold the data in the primary database, you will receive an error. To increase the size of the synchronous replication database, follow normal procedures to add additional storage space with the addvol
utility. For information on addvol
, see the VERSANT Database Administration Manual.
See also the VERSANT Database Fundamentals Manual for an explanation of synchronous database replication.
db2tty -D dbname [ options ] [ classnames ... ]
db2tty -D dbname [ -l ] -o loids
Display the contents of the database specified as dbname
.
In the first form, you can optionally specify the names of classes whose contents you want displayed. In the second form, you can specify the objects you want displayed by using their logical object identifiers (loids.)
Options are:
-i
-a
-c
-s
-t LX
LX
.
-l
-n
200
.
This option can be only used with the -i
option.
-o loids
dbid -N
Create a new osc-dbid
database system identifier file in the current directory.
The osc-dbid
file stores the path and name of all databases in a particular database system. The dbid
utility is used by the createdb
and removedb
utilities.
Normally, you should not invoke dbid
explicitly unless directed to do so by VERSANT Customer Support.
See also setdbid
.
dbinfo option database_name
Determine or set the current mode of the database specified as database_name
.
Options are:
-m
multi-user
mode.This is the "normal" mode for a database.
For a group database, this means that, per the "normal" definition of a group database, any number of users can make any number of connections.
For a personal database, this means that, per the "normal" definition of a personal database, only one user at a time can use it and can use it only as a session database.
-0
unstartable
mode.
This mode prohibits all access to the database and prevents it from being started with the startdb
utility or vutil
tool. You should use the unstartable
mode when you want to restore a database with the vbackup
utility.
-1
dba/single-connection
mode.The database is startable, but it will only accept a single connection from a single client run by the database administrator.
-d
The database is startable, but it will only accept connections from clients run by the DBA.
-p
-c
.lock
hidden file in the current directory.
The dbinfo
utility may be invoked either at the command line or through either the o_utility()
or o_dbinfoapi()
function.
You can change a database mode from one state to another at any time. After a new mode is set, it only affects new connections, and existing connections run without interruption. If you want to break existing connections, after running dbinfo
, you must stop the database with stopdb
.
One purpose of the dbinfo
utility is to allow a way to guarantee that the dba is the only user of a database during a database reorganize operation with the reorgdb
utility. To guarantee that the dba is the sole user, run dbinfo
to set the database mode to either dba-only
or dba/single-connection
.
dblist [options] [@node]
List databases in a system of databases coordinated by an osc-dbid
database system identifier file.
To run dblist
on a remote node, specify the name of the remote machine using the optional @node
argument, where node
is the name of the remote machine.
If there are multiple database systems in your network, the databases listed will be those in the network database system coordinated by the osc-dbid
file specified in the currently set environment parameters VERSANT_DBID_NODE
and VERSANT_DBID
.
Options are:
-all
osc-dbid
database system identifier file specified in the currently set environment parameters VERSANT_DBID_NODE
and VERSANT_DBID
.The default.
See also the "Database Directories and Environment" chapter for information on the search procedures used to determine the current database system.
-owner owner_name
owner_name
.
-d dbname[@node]
For a remote database, append the node name to the database name using the syntax database@node
.
-dir
VERSANT_DB
environment parameter plus all databases that would be returned by the -all
option.
-noprint
dblist
dblist -all
dblist -owner myname
dblist -dir
VERSANT Utility DBLIST Version 5.0.5
Copyright (c) 1989-1996 VERSANT Object Technology
DBID file header :
max ID = 8160
version = 10000
version2 = 10000
entries = 23
valid entries = 9
path = /versant/osc-dbid
ID = 8109
DB name = db09@server1
creator = cp
date created = Fri Mar 10 18:52:04 1996
db type = GROUP DATABASE
db version = 5.0.3
ID = 7512
DB name = db02@server2
creator = cp
date created = Wed Nov 2 09:46:53 1995
db type = GROUP DATABASE
db version = 4.0.8
....
dbtool [ options ] dbname
Depending upon options, for a specified database you can use the dbtool
utility to:
get information about locks.
get information about an object.
get information about transactions.
get information about processes and threads.
get information about running databases.
get information about storage volumes.
get information about indexes.
get information about event notification status
cluster instances of a class.
create and delete indexes.
set the default storage volume for instances of a class.
set a performance tuning parameter.
trace components of a database server.
This utility can be used only by the dba owner of the specified database. It cannot be called using an interface routine such as o_utility()
.
Following are options for dbtool
, arranged by functionality.
-k
-K
option for more information.
-K [-c connectionid ..] [-o loid ... ]
For connectionid..
, you can specify one or more connection identifiers.
For loid..
, you can specify one or more logical object identifiers in dotted triple notation.
You can use either or both of the -c
and -o
options. If neither -c
or -o
are supplied, -K
is similar to -k
, except that -K
supplies more information than -k
.
For example, for a database named group
:
dbtool -K group
dbtool -K -c 1 group
dbtool -K -o 1.0.23456 group
dbtool -K -c 1 -o 1.0.2345 group
dbtool -K -c 1 2 -o 1.0.12345 1.0.45678 group
For each connection, the following will be printed:
The connection identifier.
Information about the connection, including client hostname, client process identifier, and username.
For each locked object, the following will be printed:
The logical object identifier (loid) and class name.
The lock mode.
Lock flags indicating whether the lock has been granted ("Hold
") or being waited for ("Wait
"), and whether the lock is a short lock ("Transient
") or a long lock ("Persistent
"). Objects with short locks are listed separately from objects with persistent locks.
Following is sample output that shows information for all locks held on objects in a database named db2
. Note that there are two users.
User venka
is on a machine named alpha
with a VERSANT connection id of 6
and a system process id of 28737
. User venka
holds 6
short locks and is waiting for 1
short lock. User venka
is in a session named VersantView-28737
, which is a default name created by the Versant View browser program based upon the process id.
User george
is on a machine named beta
with connection 10
and process 28742
. User george
holds 7
short locks. User george
is in a session named VersantView-28742
.
In this case, most of the locks are held on objects of class Course
. Locks indicated as an instance of class
are on a class object. Locks indicated as an instance of attribute
are on an attribute object.
Note that the type of short lock is indicated by the usual symbols for lock mode parameters (WLOCK
= write lock, RIWLOCK
= read/intention-write lock, IWLOCK
= intention-write lock, ULOCK
= update lock, RLOCK
= read lock, IRLOCK
= intention-read lock, and NOLOCK
= null lock.)
% dbtool -K db2
Connection Id: 6
Client: alpha[pid: 28737] Session: VersantView-28737 User: venka
LOID [instance of] Lock Lock Flags
========================== =========== ==========
347.0.162850 [Course ] RLOCK Hold,Transient
347.0.162849 [Course ] RLOCK Hold,Transient
347.0.162848 [Course ] WLOCK Wait,Transient
347.0.162822 [attribute ] RLOCK Hold,Transient
0.0.2 [class ] IRLOCK Hold,Transient
347.0.162821 [attribute ] RLOCK Hold,Transient
347.0.162820 [class ] IRLOCK Hold,Transient
Number of locks: 7
Connection Id: 10
Client: beta[pid: 28742] Session: VersantView-28742 User: george
LOID [instance of] Lock Lock Flags
=========================== =========== ==========
347.0.162850 [Course ] RLOCK Hold,Transient
347.0.162849 [Course ] RLOCK Hold,Transient
347.0.162848 [Course ] RLOCK Hold,Transient
347.0.162822 [attribute ] RLOCK Hold,Transient
0.0.2 [class ] IRLOCK Hold,Transient
347.0.162821 [attribute ] RLOCK Hold,Transient
347.0.162820 [class ] IRLOCK Hold,Transient
Number of locks: 7
Following is sample output for an object with loid 347.0.162849
in database db1
. In this case, user venka
has a short read lock on this object and user george
has an update lock and is waiting for a write lock on the same object. From the point of view of a database, each transaction has only one lock entry per object, so in this case, even though george
has an update lock, what you will see is an entry showing the wait for a write lock.
% dbtool -K -o 347.0.162849 db1
Connection Id: 7
Client: alpha[pid: 28790] Session: VersantView-28790 User: venka
LOID [instance of] Lock Lock Flags
=========================== =========== ==========
347.0.162849 [Course ] RLOCK Hold,Transient
Number of locks: 1
Connection Id: 22
Client: beta[pid: 28814] Session: VersantView-28814 User: george
LOID [instance of] Lock Lock Flags
=========================== =========== ==========
347.0.162849 [Course ] WLOCK Wait,Transient
Number of locks: 1
-s
Following is sample output for a database named group
that shows lock statistics since the moment when the database was started.
dbtool -s group
** Lock Statistics **
Locking statistics:
total = 98443
outstanding = 97659
deadlocks = 0
conflicts = 0
requests = 196101
objects = 97659
Following is an explanation of the lock statistics.
total
the number of locks granted since the database was started.
outstanding
the current number of locks granted (a particular object may have more than one lock; for example, an object might have numerous read locks.)
deadlocks
the number of deadlocks that have occurred since the database was started.
conflicts
the number of times a lock request has been blocked since the database was started.
requests
the number of lock requests since the database was started.
objects
the number of locked objects.
-L loid
The information printed is useful primarily to Versant Technical Support, as it indicates information about the internal workings of VERSANT.
For example:
dbtool -L 2142.0.7187 group
LOID : [2142:0:7187] is in AT and in data page
{Rvolid=0, Rpage=70, Rslot=114}
KIND : Normal object
CLASS : class
SIZE : 248
STATUS : Normal
TYPE : Normal, never moved.
-t
For example:
dbtool -t group
** Transaction Info **
--------------------------------------------------------------------
transaction ID long trans ID Coord count flags pid name
--------------------------------------------------------------------
02142.000.00114691 00000.000.00000000 yes 00000 x0290 00029 dbtool
02142.000.00012291 00000.000.00000000 yes 97659 x0290 00024 setup
Following is an explanation of the transaction information provided.
transaction ID
Short transaction identifiers assigned by VERSANT. This information is for use by Versant Technical support.
long trans ID
Long transaction identifiers assigned by VERSANT. This information is for use by Versant Technical support.
Coord
an indication of whether this database is storing coordinator information for two-phase commits (in other words, whether the specified database is being used as a session database.)
count
the number of current transactions on this database.
flags
and pid
these columns provides internal information useful to Versant Technical Support.
name
the applications with a current connection to the database.
-U
Following is sample output. In the case of the "Processes and Threads" table, the output for the "user@client..
" column has been wrapped to the next line.
dbtool -U group
Resources being used by the database: group
Shared Memory:
The following segments are in use:
1 43000
2 43001
Processes and Threads:
PID TID ConnID State Type
User@client[IP address:port], clientpid[session]
--------------------------------------------------
28808 1 19 alive Vbackup
28788 1 2 alive Cleanbe-proc
28789 1 3 alive Single-proc
venka@alpha[single process],28789[test1]
28792 1 5 alive Obe-proc
28792 4 6 alive Cleanbe-thrd
28792 5 7 alive Obe-thrd venka@alpha[192.70.173.172:37109],28790[test2]
Shared memory
group
.
group
. The columns are:
PID
The operating system process identifier.
TID
The operating system thread identifier.
ConnId
The connection identifier assigned by VERSANT.
State
Whether the thread or process is "alive
" or "dead
".
Type
The type of thread or process. The following codes are used:
Obe-thrd
, a database thread that serves an application
Single-proc
, an application running as a single process
Cleanbe-proc
, a database cleanup process
Obe-proc
, a database management process
Cleanup-thrd
, a clean-up thread running within the server process
Vbackup
, a process used by the vbackup
utility.
Special
, a special process, such as an event daemon.
The client information will include the following:
Username@hostname
the user and machine names associated with the application that has a database connection.
IP address:port number
If the application is running in a single process, you will see [single process]
. If the application is running in a different process, you will see the system TCP/IP address number (such as 192.70.173.172 in the above example) and port number (such as 37109) for the application.
Process ID
The operating system process identifier (such as 28790
in the above example.)
Session name
The name of the VERSANT session (either a specified or default name.)
-activedb
VERSANT_DB
in use by the current process. If there are multiple database root directories on the machine, the names of the databases running under the other root directories will not be returned.
The information returned is the same as returned by the C/VERSANT function o_getactivedblist()
.
-P
For example:
dbtool -P group
Volume 0:
Sysname "sysvol" Size: 131072K
Pathname "/net/vp/mvp/lang/george/versant/db/group/system"
In the above case, the database group
has one data storage volume named sysvol
. It is 131
,072
K
bytes in size and is located at /net/vp/mvp/lang/george/versant/db/group/system
.
-cluster class1 [class2 ...]
This action does not force a clustering. Instead, it suggests to the database that a clustering should be performed. If a class already has been assigned storage, no action will be taken for that class.
If any of your classes already have instances, the system returns this error:
6074, SCH_CLS_MUST_BE_EMPTY: Class must be empty to be clustered
See the C/VERSANT function o_cluster()
for more information.
-il [ class [ attribute ] ]
All indexes for a database are displayed if no options are specified. All indexes for a class are displayed if only a class name if specified. Indexes for an attribute are displayed if a class and attribute are specified. No index information is displayed if no index exists. Names are case sensitive.
If the class was created with C++, you must use the precise attribute name (see the C++ Reference Manual for details.) For example, for the name
attribute of class Employee
in database group
:
dbtool -il Employee Employee::name group
Following is sample output for a database named group
.
dbtool -il group
Class: FormNode Attribute: ten
Domain: o_2b Length: 2
Index: BTREE
Creation time: Tue Jul 30 10:49:27 1996
Number of pages: 2
Located in volumes:
/net/vp/mvp/lang/george/versant/db/group/system/sysvol
-ils
This is the same as using -il
without options, except that the display format is different.
For example:
Employee ssn o_u1b 11 Btree
Information that does not fit in the tabular display does not appear.
-ich class attribute
For example, to create a hash index on an attribute named ten
in class FormNode
in database group
:
dbtool -ich FormNode ten group
-ichu class attribute
For example, to create a hash index on an attribute named ten
in class FormNode
in database group
and enforce unique values in attribute ten
:
dbtool -ichu FormNode ten group
-icb class attribute
For example, to create a btree index on an attribute named ten
in class FormNode
in database group
:
dbtool -icb FormNode ten group
Creating btree index on FormNode.ten...
-icbu class attribute
For example, to create a btree index on an attribute named ten
in class FormNode
in database group
and enforce unique values in attribute ten
:
dbtool -icbu FormNode ten group
-idh class attribute
For example, to delete a hash index on an attribute named ten
in class FormNode
in database group
:
dbtool -idh FormNode ten group
-idb class attribute
For example, to delete a btree index on an attribute named ten
in class FormNode
in database group
:
dbtool -idb FormNode ten group
-Alloc numberOfEntries
numberOfEntries
.This option can be used for performance tuning a large database.
dbtool - [nc | nch | ncb | na ] clsspacename \
-[ fa | rr ] \
-p volume1 [-p volume2 ...] \
dbname
Define a new partition scheme and storage strategy for a database.
Strategy target
-nc clsspacename
clsspacename
.
-nch clsspacename
Specify the index with the following syntax for clsspacename
:
class_name.attr_name1
-ncb clsspacename
Specify the index with the following syntax for clsspacename
:
class_name.attr_name1
-na clsspacename
clsspacename
.
-fa
This option is the default.
Partitions are ordered in the sequence in which they were first created.
If you specify this option, the next partition will be used only when space is exhausted in the partition currently in use.
-rr
If you specify this option, data pages will be evenly allocated among all available partitions.
-p volume1 [-p volume2 ...]
Where volume1
, volume2
, ..volumen
are names of physical volumes in the partition.
If you use the -nca
option, only the first -p
parameter is used. In other words, you can add only one partition at a time.
If you have multiple processors, we recommend that you avoid using the system volume, sysvol
, for data storage. Leaving space in the system volume will allow the VERSANT internal support tables to grow in size, which can improve performance.
Example
For example, to specify that you want instances of class Employee
to be evenly allocated among all available partitions, other than the system volume, in the database db1
:
> dbtool -nc Employee -rr -p vol_1 -p vol_2 db1
To specify that you want to add a partition and allocate instances to partitions in the order in which they were created:
> dbtool -na Employee -p vol_3 db1
See also the o_partition()
function in the C/VERSANT Reference Manual.
The primary purpose of tracing is to help Versant Technical Support debug your application.
Turning tracing on will affect your performance.
Trace entries are written to a tracing log file. You can also display tracing output on stdout.
You can allow concurrent threads to share the same trace file to preserve timing as much as possible.
You can turn tracing on or off and specify tracing options either with server process profile parameters or with options to dbtool
.
If you use dbtool
, you control tracing while the database is running. Parameters used with dbtool
will override parameters set in the server profile. For example, if the profile sets tracing on, you can use dbtool
to turn it off. Options set with dbtool
persist only while the database is running: when the database restarts, tracing parameters are reset to their values in the server profile.
The options that control tracing are:
dbtool -trace [ options ]
[ command
]
Alternatives for the options
parameter are:
-file path
-database dbname
-trace
is invoked with no options parameter, dbtool
will look for the trace file specified by the VERSANT_TRACE_FILE
environment variable.
Alternatives for the command
parameter are:
-status
-on [ components ]
-off [ components ]
-create [ entries ]
-view [ components ]
-tail [ -f ] [ components ]
-f
option is specified, additional entries will be shown as they are created.
-trace
with no command parameter is the same as using the -view
command.
The following is an example of the status
command. Note how all components are on except "net
":
% dbtool -trace -database example -status
COMP DESCRIPTION ON COMP DESCRIPTION ON
==== ================ == ==== ================ ==
am Access Method ON at AT Table ON
bf Buffer Manager ON bt B-tree Manager ON
dr Dir Service ON hs Hash Indexing ON
io I/O Sub System ON lg Log Services ON
ps Process Manager ON rc Record Manager ON
sd Storage Man SD ON si Storage Man SI ON
sm Storage Manager ON tr TransactServices ON
net Network Layer -- sl System Library ON
vsl Virtual System ON ut Utility Services ON
om Object Manager ON qry Query Manager ON
lk Lock Manager ON rcv Recovery ON
csr Cursor ON ev Event ON
api Kernel API ON rpc RPC Messages ON
The following is another example of trace output. Each row represents a trace record. The "thread" field shows the process and thread which wrote the record (no entry indicates no change from the previous line). The "function" field shows the name of the internal function which wrote the the record. The "type" field indicated the type of the trace record (such as, an entry into the function or exit from the function). The "data" field shows additonal record specific information.
% dbtool -trace -file /tmp/example.vtr -view
THREAD FUNCTION TYPE DATA
========== ================ =========================
26206.0001 net_tcpRead rcvd dbid = 802, len = 16
rpc_tr_commit sent dbid = 802
net_tcpWrite sent dbid = 802, len = 256
net_tcpRead rcvd dbid = 802, len = 256
rpc_tr_commit rcvd dbid = 802
rpc_tr_beglog sent dbid = 802
net_tcpWrite sent dbid = 802, len = 256
net_tcpRead rcvd dbid = 802, len = 256
rpc_tr_beglog rcvd dbid = 802
om_capi_term exit api = o_xact
om_capi_init entr api = o_endsession
rpc_tr_commit sent dbid = 802
net_tcpWrite sent dbid = 802, len = 256
net_tcpRead rcvd dbid = 802, len = 256
rpc_tr_commit rcvd dbid = 802
rpc_discon sent dbid = 802
net_tcpWrite sent dbid = 802, len = 256
net_tcpRead rcvd dbid = 802, len = 256
rpc_discon rcvd dbid = 802
om_capi_term exit api = o_endsession
-event
You will see the following information:
Event notification status, "active" or "not active".
Event notification configuration information.
Event message queue information, such as the number of events left in the event queue.
A list of all event registration entries and their status, "active" or "not active".
dbuser cmd_alternatives [option] dbname
Add, delete, or list users of a database dbname
.
For a remote database, append the node name to the database name using the syntax database@node
.
Substitute one of the following for cmd_alternatives
:
-list
-add
-n
or -P
option.
-delete
-n
or -P
option.
-add
or -delete
, you must substitute one of the following for option
.
-n username
An error is raised if the given username
is not found in the database when you are doing a delete.
-P
When public access is on, all database users can access the database. When public access is off, only users in the user list can access the database.
To turn public access on, use -add -P
.
To turn public access off, use -delete -P
.
-add
you may also use the following option.
-m access_mode
-n
or -p
.
Alternatives for access_mode
are:
r
Read-only access.
rw
Read/write access, which is the default.
To see the current access mode of each user, use dbuser
-list
.
If you have access to a database but are not the owner, you cannot give or delete the access privileges of others.
After a database has been created, you can change its ownership by changing the ownership of its database directory.
Examples:
dbuser -add -n fred -r db1
dbuser -add -P db1
dbuser -delete -n ethel db1
dbuser -list db1
UNIX dropclass options [-d dbname] class1 [class2 class3 ...]
PC dropcls options [-d dbname] class1 [class2 class3 ...]
Drop one or more specified classes, their subclasses, and their instances from the specified database dbname
.
For a remote database, append the node name to the database name using the syntax database@node
.
This utility is used only in special circumstances since the Schema Change Utility can also drop classes when a class must be replaced.
Arguments:
options
-d dbname
O_DBNAME
.
For a remote database, append the node name to the database name using the syntax database@node
.
class1 ...
-n
-y
dropinst options [-d dbname] class1 [class2 class3 ...]
Remove all instances of one or more specified classes and their subclasses from the specified database dbname
without changing the database schema.
For a remote database, append the node name to the database name using the syntax database@node
.
Elements:
options
-d dbname
O_DBNAME
.
class1 ...
-y
For example, to drop all instances of PObject
and all classes deriving from PObject
from the database myDB
without changing the database schema:
dropinst -y -d myDB PObject
ftstool option dbname
Control automatic synchronization of Fault Tolerant Server.
Parameters are:
|
Name of a database. |
|
Synchronization option. |
|
Immediately fork a polling process. |
|
Disable forking of a polling process. |
|
Stop polling and discard accumulated polling records. This option is used while performing an online replica rebuild. |
|
The database is running normally. |
|
The database is not running. |
|
The polling process has connected to the up database and is trying to connect to the failed database. The up database is running normally while its replaca pair is down. Resynchronization records are being saved. |
|
The polling process has succeded in connecting to both the up database and the failed database and is performing resynchonization. |
|
The up database is running normally while its replica pair is down. Polling is not occurring, and database changes are not being saved to a resynchronization log. |
|
The up database is running normally; the other database in the replica pair is also running and the other database is in the process of being resynchronized. |
By default, if one database in a replication pair goes down, the other database forks a polling process to watch for its return. Then, when the failed database returns, the polling process automatically resynchronizes the disrupted database with the database that did not go down. After the synchronization is complete, the polling process removes itself from memory. You can use ftstool
to disable or delay the forking of a polling process on the specified database.
Once you have invoked ftstool
, the on or off setting for automatic synchronization is persistent only while the database is running: when the database stops, the on or off setting is lost.
For example, the following turns off automatic synchronization for the database mydb
:
ftstool -pollingdelay -1 mydb
If you want to do manual polling, use the polling
uility.
If you have stopped synchronization and later want to resynchronize the failed database, you can use the vbackup
utility with the -startsync
option.
Typical sequence of events
The purpose of the Fault Tolerant Server (FTS) option is to keep two databases in synchronization so that you can continue operating if either of the databases fail.
Following is a typical sequence of events in which a database fails but quickly returns.
1. You create a replica pair.
UP
" status.
UP
database normally.
POLLING
and tries to connect to the failed database.
DOWN
database returns, the polling process connects to the failed database and starts the resynchronization process. At the beginnning of the resynchronization, the polling process changes the state of the operating database from POLLING
to SYNC
. The failed database is synchronized with the SYNC
database.
1. Stop synchronization.
ftstool
to stop synchronization:
ftstool -stopsync dbname
This will change the status of the operating database from "POLLING
" or "SYNC
" to "SUSPEND
" and discard accumulated resynch records.
If the specified database is in any state other than "POLLING
" or SYNC
when this option is used, the error UT_DB_WRONG_STATE
will be returned.
If the failed database comes back on line after this option has been used, no synchronization will occur.
For example, suppose that the failed database is totally destroyed. First, remove the failed database and its directories:
removedb -rmdir dbfailed
Then, recreate the directories and database files, using the same name as the database that failed:
makedb dbfailed
dbname
to a file named dbname.0
:
vbackup -dev dbname.0 -startsync -backup dbname
See the description of vbackup
for more information on backup options.
If you use the -startsync
option and the specified database name is not found in the FTS replica file, an error will be returned. Using the above option changes the database state from SUSPEND
to AWAITING_RESTORE
. If the status of the running database is not SUSPEND
when the vbackup
command is executed, the error UT_DB_WRONG_STATE
will be returned.
If an error occurs during backup process, step 1 (ftstool -stopsync
) has to be replayed.
dbnew
and restore it with the contents of dbname
as stored in the file dbname.0
:
vbackup -dev dbname.0 -restore dbname -rename dbnew
The above command will automatically start polling (unless automatic polling has been turned off), resynchronize the databases when the backup has been completed, and resume Fault Tolerant Server operations.
AWAITING_RESTORE
". When the backup is completed, the status of the running database will become "POLLING
". When the synchronization is completed, the status of the running database will become "UP
".
See also vbackup
.
makedb [options] dbname
If it does not already exist, create a database directory named dbname
per the options in the options
parameter, and, if they do not already exist, create database support files.
You must run makedb
or create a database directory and profile files manually before creating a database with createdb
.
For a remote database, append the node name to the database name using the syntax dbname@node
.
For options
you can substitute:
-g
Group databases are accessible to many users at the same time.
-p
Personal databases are accessible to one application at a time.
-owner user
user
the owner of the database directory. The default is to use the current login name.You can only make someone else the owner if you are logged in as the superuser.
-cpprofile db
profile.be
from the specified db
directory to the directory for the new database.This option works only if both databases are on the same machine.
If only a database name is used rather than a full path name, the db
directory under the database root directory is searched.
-nofeprofile
-logging
-locking
-noprint
-sglatch
By default, the database server process will use multi-latching.
See also the description of the multi_latch
parameter in the "Database Profiles" chapter.
/dbroot/dbname
dbname
.
../.osc/dbname
osc
directory branching from your home directory. This file contains operating parameters used when this database is a session database.
profile.be
.lock
.dbtype
Command |
Result |
makedb db
|
db is a group database
|
makedb -g db
|
db is a group database
|
|
|
makeprofile [options] dbname
Make application process and server process profiles for a database named dbname
.
For a remote database, append the node name to the database name using the syntax database@node
.
Options are:
-cpprofile db
db
directory.
If only a database name is used rather than a full path name, the db
directory under the database root directory will be used.
-nofeprofile
-logging
-locking
-noprint
-sglatch
By default, the database server process will use multi-latching.
See also the description of the multi_latch
parameter in the "Database Profiles" chapter.
myDB
:
makeprofile myDB
If you are recreating a database previously removed with the removedb
utility, you can reuse the directories and profiles without having to run makeprofile
or makedb
.
NetworkServices
On Windows machines, provide a graphic interface that allows you to use multiple releases on the same machine.
You can use the NetworkServices.exe
gui interface to configure the VERSANT service, versantd
, to listen and respond on multiple ports so that you can use multiple VERSANT releases on the same machine. To perform the same task manually, you can set the VERSANT_SERVICE_NAME
environment parameter (as described in the chapter "Configuration Parameters."
If you have multiple VERSANT releases on your machine, you may want to connect to servers from one or the other of these releases selectively from different clients. This is an advanced option and requires careful configuration. This is not something you normally need to do, and we recommend that you do it only with the guidance of VERSANT Technical Support.
About the VERSANT system service
The TCP/IP system service that listens for database requests is named versantd
on Windows machines and oscssd
on Unix machines.
In a default installation, the VERSANT connection services daemon listens on TCP/IP port 5019. In the default case, all clients try to connect to the VERSANT service on the server machine, and the service name is mapped to a port number using the TCP/IP configuration file on the client machine (not the server machine).
By using the NetworkServices
gui, you can cause a client application to connect to a different service name and, therefore, a different port number. Correspondingly, on the server machine you can set up different VERSANT releases to listen on different port numbers and allow a client to connect to a VERSANT server process from the release of their choice.
During VERSANT installation on a Windows machine, versantd
is added to the list of available services and automatically starts when NT starts.
When versantd
starts, it does the following:
1. It reads the services file located in the system directory, looking for service names that begin with the prefix "osc
". The services file contains port numbers for well-known services.
%SYSTEM_ROOT$\System32\drivers\etc\services
The services file has entries in the format:
<service name> <port number>/<protocol> [aliases...] [#<comment>]
For example:
ftp 21/tcp
telnet 23/tcp
smtp 25/tcp mail
oscssd 5019/tcp # VERSANT connect service
versantd
daemon next retrieves information about the services from the registry.
HKEY_LOCAL_MACHINE\SYSTEM\CurrentControlSet\Services..
\Versantd\Services Config
At this location, versantd
will find three key pieces of information:
the Service Name
the name and location of the process associated with the service, and
the port number that the versantd
will monitor which, in turn, will spawn the associated process.
versantd
finishes its initialization phase, it monitors the appropriate ports and spawn the associated process once an action is requested on that port.
All significant actions associated with the versantd
program are recorded in the Application Event log.
On Windows NT, you can monitor a maximum of 64 ports.
Adding additional ports and services
If you want versantd
to monitor additional ports, you can use the VERSANT Network Services interface.
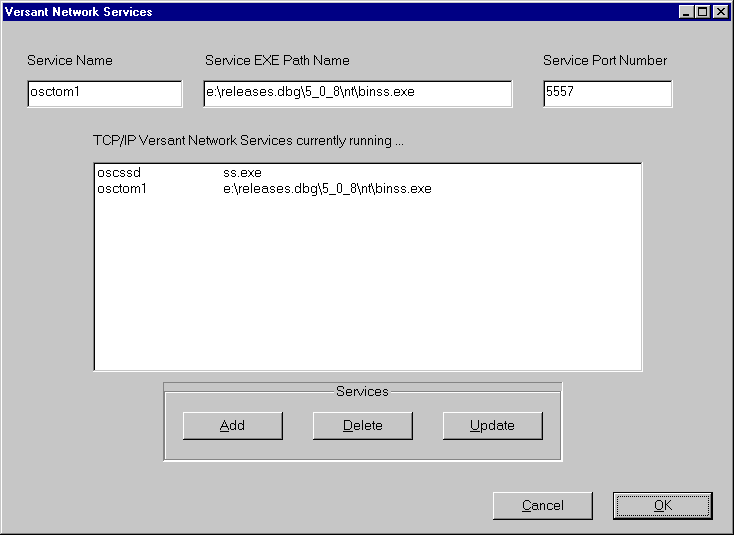
To open the VERSANT Network Services interface, double-click on NetworkServices.exe
in your VERSANT \bin
directory.
The VERSANT Network Services interface looks like this (actual entries will vary depending on your configuration):
Add a service
Service
Name
Box
, enter either the default of ss.exe
, or the full pathname of the program associated with the service, and the proper port number.You must be careful to enter a valid port number. If you do not enter a proper port number, you will cause problems and conflicts on your system.
After making your entries, simply press the Add
button, and the new service will be added.
Delete
button.
After making your changes, press the Update
button. The changes will be reflected in the list.
There are some restrictions associated with the service name.
The service name begin with the prefix "osc
".
The service name can only contain the alphanumeric characters, a-z
, A-Z
, 0-9
. It can not contain a dash, underscore, or any other characters.
Use of invalid characters will cause problems. There is a check and a force for the prefix: if you do not have the osc
prefix characters in the service name, the prefix osc
will be automatically added.
When done
When you have finished making your changes, press the OK
button to terminate the GUI and permanently record the changes.
To abort the changes, press Cancel
.
When you press OK
, the following will happen:
The OK
button will change to WAIT
.
The services configuration is saved in the registry in the following location"
HKEY_LOCAL_MACHINE\SYSTEM\CurrentControlSet\Services.. \Versantd\Services Config"
The TCP/IP service is stopped and restarted, which forces it to read the changes in the services file.
The versantd
service is stopped and restarted, which forces it to read the changes in the services file and registry.
oscp parameter
Display information about your VERSANT environment for the release you are using.
Options that you can substitute for parameter
are (with examples shown for a UNIX installation):
-d
For example, the return information might be:
/versant/db
-i
osc-dbid
database system file, and ss.d
location.For example, the return information might be:
Versant Product Version: 5.2.4
Versant Root Path: /usr/local/versant
Versant Runtime Path: /usr/local/versant/5.2.4/sun4
Versant DB Directory: /versant/db
Versant osc-dbid node name: our_server
Versant osc-dbid path: /visible_directory
Versant ss.d Location:
/usr/local/versant/5.2.4/sun4/bin/ss.d
-l [@remote_host]
oscp
. The default is the level of oscp
on your local machine; to find the release level on another machine, specify the name of the remote machine using @remote_host
syntax.For example:
5.2.4 patch 1
-r
For example:
/usr/local/versant
-p
For example:
/usr/local/versant/5.2.4/sun4
-v
For example, the return information might be:
5.2.4
-n
osc-dbid
database system file.
-o
osc-dbid
database system file.
polling fromdb
Manually synchronize two databases in a replication pair, using the database specified as fromdb
as a source. The target database will be found in the Fault Tolerant Server configuration file.
This utility is useful if you are using synchronous database replication (the Fault Tolerant Server option) and have disabled automatic synchronization with the ftstool
utility.
See ftstool
for more information on synchronization. Also see the chapter "Fault Tolerant Server" in the Database Fundamentals Manual.
removedb [options] dbname
Stop the database if it is running, destroy and remove all volumes of the database dbname
, and delete the database from the system database identifier file osc-dbid
.
For a remote database, append the node name to the database name using the syntax database@node
.
Options are:
-f
Without the -f
option, the database will not be removed if it is in use by an active transaction. If it is in use, the message "Database in Use"
will be printed and removedb
will be terminated.
-rmdir
-noprint
osc-dbid
file must be visible from your machine before you run removedb
. Only the owner of a database can remove it.
When you remove a database, all volumes associated with the database are removed. This includes any extra storage volumes that have been added after the database was created. However, the database directories and profiles are not deleted when you run removedb
unless you specify -rmdir
. If you do not delete the directories and files, you can recreate a removed database using the same directories and profiles.
If you delete database directories manually but do not run removedb
, the database numerical identifier and information about the old name and path remain in the osc-dbid
database system file. Also, if you delete the database directories manually, shared memory will not be removed.
If you accidentally delete database files manually and now want to remove the database information from the osc-dbid
file, use the command:
dbid -d mydb
But, do not use the above command under normal circumstances!
Examples:
removedb my_db
removedb -f my_db
removedb -rmdir mydb
removereplica [options] replicadb
Stop synchronous replication, remove a synchronous replication database named replicadb
, and leave the database directory and profile files intact.
To stop synchronous database replication, you must use removereplica
.
After calling removereplica
, you must manually remove the entry for the synchronous replication database in the replica file for the VERSANT installation you are using,
Because the database directory and profile files are left intact, you do not have to rerun makedb
before creating a new database with the same name either with createdb
or createreplica
.
Options are:
-f
-f
option will forcibly stop the database and is the same as using stopdb
-f
.
-rmdir
-noprint
removereplica
is the same as using removedb
and then manually editing the replica file with a text editor.
You can call removereplica
from a program by using the C/VERSANT o_utility()
function or the C++/VERSANT utility()
method and specifying the parameter O_UT_REMOVEREPLICA
.
See also the "Special Topics" chapter in the Database Administration Manual for an explanation of synchronous database replication.
reorgdb [options] dbname
Reorganize all data volumes for the database dbname
by rearranging objects to remove gaps in physical space.
The purpose of the reorgdb
utility is to pack data so that space is used more efficiently.
Options are:
-noprint
dbname@node
.
Caution Any interruption, such as a system failure or use of Ctrl-C
, may result in an inconsistent database. Since you may lose your database if reorgdb
fails before completion, we recommend that you backup your database before reorganizing it.
The sequence of steps involved in reorganizing a database is:
1. Set the database to single-connection mode. For example:
dbinfo -1 mydb
stopdb mydb
reorgdb
. For example:
reorgdb mydb
setdbid dbid dbname
Set the database identifier for a specified database to a specified value.
Parameters are:
dbid
The specified identifier must not have been used previously. To find the database identifiers of existing databases, use the dblist
utility.
dbname
osc-dbid
file, opens the osc-dbid
file, and changes the entry associated with dbname
to dbid
. It also changes the value of the identifier in the database itself. It does not change the logical object identifiers of objects already defined in the database.
startdb dbname
Start the database dbname
.
For a remote database, append the node name to the database name using the syntax database@node
.
Example:
startdb my_db
If the database was previously interrupted during a transaction, starting the database will automatically start a database recovery process. For information on how to start a database without recovery from interrupted transactions, please call Versant Customer Support.
Using the VERSANT database system typically involves the following basic actions:
1. Start personal and group databases that will be used by the application.
2. Start a session in a personal or group database.
3. Optionally connect to one or more group databases.
4. Disconnect from group databases. Disconnecting from a database will not stop it.
5. End a session. Ending a session will not stop the session database.
6. Optionally stop personal and group databases.
Starting a database with startdb
creates an operating environment, performs any necessary recovery and cleanup operations and prepares the VERSANT Manager and VERSANT Servers for access.
Starting a database is optional, because an attempt to connect to a database will start that database if it is not already started. In the case of group databases, an explicit startup is preferred as it leaves the database ready for use without delay, and you have a chance to detect any possible errors as soon as possible.
To begin or end a database session and to make or break a connection to a group database, use language specific interface routines from within an application. To stop a database explicitly, use the stopdb
utility.
After a crash, a startdb
failure may not get reported on the screen and may have to be read from a file named LOGFILE
in the database directory.
A startdb
failure will also be indicated by the absence of the cleanbe
process.
During execution of startdb
you may see the following message:
Init SDA failed...
This means that the system does not have enough shared memory. Either increase system swap space, reduce the server process heap size, or stop some other database.
stopdb [-noprint] [option] dbname
Stop the database dbname
and remove all database resources in memory.
For a remote database, append the node name to the database name using the syntax database@node
.
Parameters:
-noprint
stopdb
is running.
option
-st
If you attempt to start a new transaction while stopdb
is waiting, the system generates the following error:
SM_TR_XACTS_BLOCKED being returned to the application.
-s
This option will wait for all active updates to finish before bringing the database down. If you try to start a new update while stopdb
is waiting, the system generates the following error:
SM_TR_NEW_UPDATES_BLOCKED being returned to the application.
This option will also wait for all active transactions to finish.
-f
If -f
is not used and the database is in use, the message "Database
in
Use"
will be printed, and the stopdb
utility will terminate.
Please use the -f
option with care.
For example, to stop a database named db_test
:
stopdb db_test
vbackup [options] command
Manage database backup, restore, and roll forward archiving operations.
command
parameter are:
|
Backup a database. |
|
When FTS is on and when used with |
|
Restore a database. |
|
When used with |
|
Disable roll forwarding. |
|
Start roll forward archiving. |
|
Provide information about the contents of a backup file. |
|
List the set of backups necessary to restore a database. This parameter requires use of the -device option parameter. |
options
parameter are:
|
Specify incremental level of backup. |
|
Specify the backup or restore device. |
|
Specify position on tape for backup or restore. |
|
Specify tape capacity. |
|
Specify number of bytes to read or write at a time. |
|
Specify a comment to be associated with a backup. |
|
Enable roll forward archiving during backup. |
|
Specify buffer flushing interval. |
|
Specify a script from which to run vbackup. |
vbackup
utility is to allow recovery from a device failure or from accidental deletion of data. If you use just the backup and restore features, you can recover to the point of the last backup. If you also use the roll forward features, you can recover to the point of the last committed transaction.
vbackup
on a database, you must be the dba user who created the database.
If a database device is completely demolished, you can recreate the database directories on another device with makedb
and then use vbackup
to both create and restore the database in one step.
If the recoverable errors "device
not
ready
" or "end
of
tape
" are encountered, you will be given a chance to correct the error and resume the backup or restore. Except for these recoverable errors, backups are not interactive and can therefore be called from a script.
All functionality of vbackup
is also available from the graphical VERSANT Utilities Tool.
For options and commands, it is not necessary to specify the full flag as long as enough is specified to be unambiguous. For example, since no other flag begins with 'd
', you can shorten -device
to any of the following: -devic -devi -dev -de -d
Following are explanations of the command
and options
parameters.
-backup [options] dbname1 [dbname2 ...]
dbname
.
Use dbname@host
syntax to specify a remote database.
You can backup multiple databases to a single tape drive, but not to a single file. To backup multiple databases to files, you must invoke the command multiple times, each time using a different file name.
Database backups can be "online," which means that a database can be backed up while it is being used.
Backups can be "incremental," which means saving only changes made since the last backup, or "full," which means saving the entire database.
If multiple databases are backed up with a single command, the first one will be stored in the position specified in the position
parameter (see the option
parameters below) and any additional ones will be appended after it.
A database backup saves the results of all transactions committed at the time vbackup
is invoked. For additional safety, you may want also to use the -rollforward
option in conjunction with the -backup
command. This will ensure that no log records are discarded unless they have been archived, either with another backup or as a result of roll forward archiving with the -log
command.
You must invoke the -backup
command on the machine on which the database to be backed up resides. You cannot backup a remote database.
For example, to backup a database named group
to the file /tmp/level0
and also turn roll forwarding on:
vbackup -dev /tmp/level0 -rollforward -backup group
For this example, you will then see something like the following (the version number actually shown will match your release number):
VERSANT Utility VBACKUP Version 5.0.5
Copyright (c) 1989-1996 VERSANT Object Technology
Backing up database 'group' to device '/tmp/level0':
0% 50% 100%
| | | | |
........................................
Backup has completed successfully.
-backup [options] dbname -startsync
If the specified database is not named in the FTS replica file, an error will be returned.
Afterwards, the specified database will be in the state AWAITING_RESTORE
. See the description of the ftstool
utility for an explanation of database states and a typical usage scenario.
-restore [options] dbname1 [dbname2 ...]
dbname
.
Invoking -restore
will immediately stop the specified databases (if running) and set them to dba/single-connection
mode. After the restore is complete, the database mode of the specified databases will be set to multi-user
mode.
Before the restore begins, you are given an opportunity to save the current log files so that you can roll forward to the most recent committed transaction.
The first restore done must always be a level 0
restore. Once this restore has successfully completed, you will be asked if you would like to do an additional level of restore or if you would like to quit.
If you answer yes
to do another restore, you can insert a tape with any level 1
or 2
backup that is incremental to the level 0
from which you just restored.
Before invoking the restore
command, you must first locate the backups from which you will be restoring. If the database no longer exists, you must use your own records to determine the required backups. If the database is intact and you are restoring because you have accidentally deleted important data, you can use the -info
command to list the backups necessary to restore to the most recently backed up state.
Once you know what your backups are, you must next locate the tapes on which they are stored. The -list
command can be used to verify the presence and position of the backups on the tape.
If roll forward archiving was on when the last backup was created, after you have restored from the backup tapes, you will be asked to insert the roll forward backup tape with the appropriate sequence number. You will also be asked for a safe location to which the current database logical log file can be copied so that it is not overwitten during the restore. You will be asked to insert successive roll forward backup tapes until you have no more backups to restore. At this point, type quit
to exit.
You must invoke the -restore
command on the machine on which the database to be restored resides. You cannot restore a remote database.
Failure conditions When a restore starts, vbackup
first copies the existing log file to a backup file name _backup_.log
. If you encounter a failure during the restore operation, you need to copy the backup file to your logical log file, which is, by default, named logical.log
. After doing this, you can retry to restore the database. If you do not copy the backup file to your logical log file before repeating a restore, you may lose the changes made by all recent committed transactions.
For example, to restore the database group
from the file /tmp/level0
:
vbackup -dev /tmp/level0 -restore group
Following is a sample of the interactive dialog and output you will see during a backup.
VERSANT Utility VBACKUP Version 5.0.5
Copyright (c) 1989-1996 VERSANT Object Technology
Restoring database 'group' from device '/tmp/level0':
During roll forward, would you like to apply records
from the database's current log file in addition to any
archived records ? [default = yes ]
This logical log file must then be copied to a safe
location so it is not overwritten during the restore.
Enter the path of the logical log [ default = '/versant/db/group/logical.log' ]
Enter the path for storing the copy [ default = '/versant/db/group/_backup_.log' ]
0% 50% 100%
| | | | |
........................................
Restore has completed successfully.
Would you like to do another level of restore
on database 'group'? [ default = no ]
Current settings are:
device = '/tmp/level0'
position = 'current'
capacity = 'dynamic'
blocking = '10 Kilobytes'
Insert log archive #1 of database 'group'. [?=help] dev /tmp/log0
Current settings are:
device = '/tmp/log0'
position = 'current'
capacity = 'dynamic'
blocking = '10 Kilobytes'
Change additional settings or type <return> to proceed. [?=help]
Current settings are:
device = '/tmp/log0'
position = 'current'
capacity = 'dynamic'
blocking = '10 Kilobytes'
Insert log archive #2 of database 'group'. [?=help] quit
After you have verified that the database was
successfully restored, remember to remove
'/versant/db/group/_backup_.log'.
At this point, when you quit, VERSANT will apply all log records in the file _backup_.log
to the database.
If an error occurs and you cannot complete the restore and/or roll forward, before trying again, replace your logical log file with the _backup_.log
file.
-restore [options] dbname -rename dnameNew
dbname
to the database specified as dbnameNew
.For example, suppose that you have done the following:
a. Backed up a database named db1
to a file named db1.0
.
b. Used the makedb
command to create database profile files and a database directory for new database named db1new
.
Now, suppose you invoke the following command:
vbackup -dev db1.0 -restore db1 -rename db1new
When you execute this command, a database named db1new
will be created (using the profile file parameters as if you had invoked createdb
manually) and initialized with the contents of the backed up database db1
.
This command is especially useful if you are using the Fault Tolerant Server option and want to make an on-line recovery after a replica database has failed.
It is essential that the restored, renamed database have a different database identifier than the original database. Accordingly, if an entry for the new database name is found in the osc-dbid
system file and the entry has the same identifier as the original database, an error will be returned.
To ensure that the renamed database has a unique identifier, you can delete any existing entry with the command:
dbid -d db1new
See the description of the ftstool
utility for a typical usage scenario.
-log dbname1 [dbname2 ...]
Roll forward logging requires its own, ongoing process. This means that the command line will not return after this command is invoked until <Enter>
is pressed a second time. Pressing <Enter>
a second time will exit the logging process, which has the effect of suspending roll forward logging, which means that log entries will continue to accumulate changes without being written to archive files.
While running, the roll forward process will report any errors which occur while writing to the archive tape or file. If the tape fills up, logging will be suspended, and you will be asked to insert a second tape.
You do not have to backup with the -backup
command and the -rollforward
option before using the -log
command, athough that is the recommended sequence. You can backup with the roll forward option and start roll forward archiving in either order, but you must do both in order to ensure that all database changes are archived and that you do not overflow your log files.
You can use the -log
command to start roll forward archiving on a remote database. To specify a remote database, use the syntax dbname@node
.
For example, to start writing log records for a database named group
to the file /tmp/log0
:
vbackup -dev /tmp/log0 -log group
For this example, you will then see something like the following (the version number actually shown will match your release number):
VERSANT Utility VBACKUP Version 5.0.5
Copyright (c) 1989-1996 VERSANT Object Technology
Press <return> when you are ready to exit.
Archiving log records to device '/tmp/log0':
Database 'group' is now being archived.
-off dbname1
[dbname2
...]
To turn roll forward archiving on, perform a backup with the -rollforward
option.
-info dbname1 [dbname2 ...]
List entries have the following format:
Level backup_level made on date/time. comment
Where:
backup_level
The incremental level of the backup: 0
, 1
, or 2
.
date/time
The date and time of the backup.
comment
The comment, if any, entered at the time of the backup.
In many circumstances, such as restoring deleted objects, list information provided by -info
will be available. However, if you are restoring from a damaged database, the same events that damaged your database may also damage backup list information. Accordingly, we recommend that you maintain your own records of the backups necessary to restore a database and not count on -info
being able to provide the backup list.
The -info
command will also tell you whether roll forward logging is currently on.
-list
Before restoring from a tape, it is common to use this command to list the contents of the tape or tapes from which you plan on doing the restore. This allows you to verify your records and to be sure that the backup files you are about to use are really on the tapes and in the positions where you believe they are.
List entries have the following format:
position position: 'label' volume volume. 'comment'
Where:
position
The position of the file on the tape, where 0
is the first file.
label
The label of the file.
volume
The volume number for the case where a backup spans multiple tapes. The first volume is 0
.
comment
The comment, if any, that was entered when the backup was made.
The format of a backup file label is:
db_name -- level backup_level backup of date-time
db_name
The name of the backed up database.
backup_level
The level of the backup.
date-time
The date and time the backup was made.
The format of a roll forward achive label is:
Logs from date-time: db1 #file-no1 [ db2 #file-no2 ...]
Where:
date-time
The date and time archiving started.
db1 ..
The database monitored.
file-no ..
The roll forward archive file sequence for the corresponding database.
options
parameter, you can substitute zero or more of the following options.Backup level
-level [ 0 | 1 | 2 ]
0
, 1
, or 2
. The default value is 0
.
This option will be ignored unless it is being used with the -backup
command.
The level options mean:
level 0
Perform a full backup.
level 1
Back up all changes made since the last level
0
backup.
level 2
Back up all changes made since the last level
0
or level
1
backup, whichever was most recent.
The most recent set of backups can be viewed with the -info
command. When a database is small, there is no problem with saving its entire state every time it is backed up, but as database size increases, it becomes more imporant to set the level in a way which minimizes backup size and time.
-device device_name
The backup device can be either a tape drive or a normal file. If this argument is not set, it will default to the value of the TAPE
environment variable.
To specify a remote device, use the syntax host:device
. A remote device will be accessed using the rsh
and rmt
programs. Because rmt
is used, remote devices are supported, but not remote files.
If you backup to a tape, you should use only non-rewinding tape devices.
On NT, the default tape device name for SCSI tapes is \\.\TAPE0
. See the notes for the NT utility vtape
for more information on device names.
-position tape_position
Specify tape_position as:
number
A non-negative number. The first position on the tape is 0
, the second is 1
, and so on. If you are using a file for the backup, the only valid position is 0
.
current
Use the keyword current
to use the current position of the tape.
append
Use the keyword append
to write after the last file on the tape.
Different tape drives have different capacities. If you want to put two backups on the same tape and your tape drive cannot do random positioning, then use append
for the second backup on the same tape.
VERSANT uses standard operating system input/output control for positioning tapes, but individual device drivers may vary in their support. Positioning to the beginning of a tape or appending to the end are the most universally supported operations.
See the Release Notes for your platform which may describe limitations on tape positioning.
-capacity tape_capacity
The purpose of this parameter is to ensure that the backup does not attempt to write past the end of the tape.
Specify tape_capacity as:
number
A number with memory units.
The default unit is megabytes; alternately, you can specify by bytes, blocks, kilobytes, megabytes, or gigabytes. Units can be abbreviated. For example, -cap 1.2g
means 1.2
gigabytes.
dynamic
Use the keyword dynamic
to trust the device to detect the end of the tape without losing any information. This is the default.
Whatever capacity was used when making a backup must also be used when restoring from that backup.
-blocking blocking_param
Specify blocking_param as:
optimal
The special non-numeric value optimal
can be used to query the device for the value which it believes is optimal, which is the default. This is a good starting point, but if tape I/O
is slow or there are other problems, you may want to increase this value for better throughput.
number
A number with memory units.
If number
is specified, the default unit is 512k
blocks. Other units such as bytes, kilobytes, megabytes, or gigabytes are also legal. Units can be abbreviated. For example, -block
63k
means 63
kilobytes.
Depending on the device, this value this may be subject to certain restrictions. For example quarter inch cartridge tapes often require the blocking to be a multiple of 512
bytes.
Whatever blocking was used to make a backup must also be used when restoring from that backup.
-comment backup_comment
This option only makes sense when used with the -backup
command and will be ignored when used with other commands. The comment specified will be stored with the backup and in the database and will appear when information about the backup is listed with the -list
or -info
commands.
A comment is useful for specifying the name or label of the tape on which the backup was made. When providing a comment, it is a good idea to enclose the comment string with single quotes. This prevents the shell from misinterpreting it as multiple arguments.
-rollforward
-backup
command, turn roll forward archiving on but do not begin writing to the roll forward log.
After this option, you are guaranteed that no log records will be discarded unless they have been archived. Accordingly, if you do not later start roll forward logging with -log
, you will sooner or later fill the log files to capacity. If a log file fills to capacity, the database will freeze until the log file is relieved by turning roll forward logging on (which will cause the log entries to be archived and then discarded) or by terminating roll forward logging entirely (which will cause the log entries to be discarded after they have been applied to a database).
-aggression
aggression_param
vbackup
is allowed to hold data in a buffer before writing to tape.
The default interval is 60
seconds. Decreasing this number can make log records go to tape more quickly, but can decrease storage efficiency. Similarly, increasing the number increases the amount of time it takes log records to be written to tape and increases storage efficiency. This is because vbackup
must write to tape only in chunks of the size specified by the -blocking
parameter.
If the interval specified by -aggression
elapses and there are still not enough unarchived log records to fill up one block, vbackup
will add padding and flush anyway. Since this padding is wasted space, storage efficiency is reduced.
The -aggression
flag can be used to specify either a single number for all databases being logged, or a list of numbers, one for each database.
-script command
This option is useful if you are running vbackup
from a script. For example, if you are performing roll forward logging, this option can be used to notify you when an archive tape fills up.
If you are using UNIX, you can insert an entry into the /etc/rc.local
file to start vbackup
whenever the system reboots. This is best done by having /etc/rc.local
run a script in a separate file which runs setuid
to the dba account. If you are using Windows or NT, you can similarly run vbackup
with an entry in a boot file. Following are relevant examples.
For example:
vbackup -script 'mail dba < vbackup.out' \
-log db1 db2 db3 > vbackup.out
The above command will start standard log archiving for three databases. If something happens which requires user input, such as the backup device becoming full, vbackup
will exit and mail its output to the dba user.
Another example:
i=0
while test $i -lt 30
do
vbackup -dev log$i -script 'echo log full | mail dba' \
-capacity 100M -log db1 db2 db3
i='expr $i + 1'
done
The above command does the same standard log archiving. Rather than archiving directly to tape, it archives to disk in a series of 100
megabyte files named log1
, log2
, log3
, etc. Whenever a new file is completed, the dba is notified via mail. To avoid an infinite loop in the case when vbackup
hits a legitimate error instead of a full tape, the script exits after 30
iterations.
There are many useful ways to use the -script
option. For example, a line could be added which copied the 100M
files to tape once it was completed. It could also be made to cycle through a series of tape devices rather than a series of files. Once one tape drive filled up, the next one would take over, thus minimizing the need for human intervention.
Following is an example of a script that allows you to switch between two disk files. When one file becomes full, it is closed, and a new file takes over while the previous file is being copied to tape.
# Archive logs to file and copy the file to tape once it
# reaches 100M. Delete the file once it is copied.
# Limit ourselves to 30 iterations to avoid infinite loops.
blocking=10k
i=1
while [ $i -le 30 ]; do
# backup logs to file
vbackup -dev log$i -capacity 100M -blocking $blocking \
-script 'echo log full | mail dba' -log group@gamehendge
# wait until the last file was copied to tape
if [ $i -gt 1 ]; then
while [ -f log'expr $i - 1' ]; do
sleep 5
done
fi
# fork a process to copy the current file to tape
(
if dd if=log$i of=/dev/nrst0 bs=$blocking; then
rm log$i
else
echo dd failed for log$i | mail dba
fi
) &
# increment i
i='expr $i + 1'
done
vbackup
has been invoked. The settings you can change after vbackup
has been invoked are device
, position
, blocking
, and capacity
.Following is an example which shows how you are given the opportunity to change the device name after initially specifying a non-existant device.
Suppose vbackup
has been invoked as follows, and the device /tmp/grp
does not exist:
# vbackup -dev /tmp/grp -backup group
In this case, you will see something like the following (the version number will correspond to your particular release number):
VERSANT Utility VBACKUP Version 5.0.5
Copyright (c) 1989-1996 VERSANT Object Technology
Backing up database 'group' to device '/tmp/grp':
0% 50% 100%
| | | | |
Current settings are:
device = '/tmp/grp'
position = 'current'
capacity = 'dynamic'
blocking = 'optimal'
Could not open device '/tmp/grp' at position 'current'.
OS error #2. Please check the device. [?=help] ?
Change a setting by typing a name and new value (for example, "position 2
"), type "quit
" to quit, or press <Return>
to proceed. It is only necessary to type enough of a command to make it unique, so you can type "q
" instead of "quit
" or "p
2
" instead of "position
2
".
After changing a setting you will see the following:
Change additional settings or type <return> to proceed. [?=help]
A rule of thumb for using backup levels is first to do a level 0
backup and then do level 1
backups. After a while, as changes accumulate, you will start to get tired of how long the level 1
backups are taking. At that point, you can start to do level 2
backups. When level 2
backups start to take a long time, then you should repeat the cycle by doing a level 0
backup.
If you do multiple level 1
and/or 2
backups, you should only use the latest one(s) when you restore the database.
For a heavily modified database, you might want to perform daily backups on a schedule similar to the following:
Day of the week: Sun Mon Tue Wed Thu Fri Sat
Level of backup: 0 1 2 0 1 2 2
A less heavily modified database might be backed up daily, but with only one full backup:
Day of the week: Sun Mon Tue Wed Thu Fri Sat
Level of backup: 0 1 2 2 1 2 2
A lightly modified database could be backed up three times a week:
Day of the week: Sun Mon Tue Wed Thu Fri Sat
Level of backup: 0 1 2
And a very lightly modified database could be backed up weekly:
Week of the month: 1st 2nd 3rd 4th
Level of backup: 0 1 1 1
In short, you should back up at a frequency that is appropriate for the importance of a database and the frequency with which objects in it are modified.
If a database is small, you can perform a full level 0
backup every time. If it is large, you should take advantage of the incremental backup feature by setting the backup level to minimize the amount of time and storage associated with each backup.
If you want to restore the database to the most recently backed up state and if the database still exists, you can use the -info
option to tell you the backup files and the order you need to use them to restore the database. If the database does not exist, you will have to figure out for yourself the order in which to use the backup files.
See also dbinfo
and stopdb
, which are utilities needed to perform restore operations.
1. Determine what backup files you need.
-info
option to vbackup
to list the set of backups necessary to restore the specified databases to their most recently backed up state. If list information is not available, you will have to rely on your own records. (See also the comments for the -info
option.)
-list
option to vbackup
to list the backup files stored on a backup device. (See also the comments for the -list
option.)
-restore
option to vbackup
. You must restore in the proper order as listed by -info
or your own records, working from the last full backup to the most recent incremental backup. (See also the comments for the -restore
option.)
vcopydb [options] dbname copy_dbname
Copy all objects and class definitions from one database to another.
Afterwards, the objects in the target database will have the same logical object identifiers as the objects in the source database.
Elements are:
dbname
copy_dbname
-i
A new database cannot be used as a replica database with the Fault Tolerant Server option.
-nocreate
An error will be returned if:
The target database does not exist.
The user does not have write access to the target database.
The target database does not have enough space allocated to it to contain all objects in the origin database.
The target database already contains user class definitions or objects. In this case, the error raised with be UT_DB_NOT_EMPTY
.
-noprint
stopdb
.
If the target database does not exist, use makedb
to create the target database directory before running vcopydb
. The target database must be of the same type (group or personal) as the source database.
See also createreplica
/createrep
.
verr err_num|err_name|err_frag
Print an error message given an error number, name, or fragment.
Arguments:
err_num
err_name
err_frag
verr
command reads error messages from the file error.txt
in the VERSANT lib
directory.
The error.txt
file also contains explanations of many errors.
Programs linked with VERSANT read error messages from the file error.msg
in the VERSANT lib
directory.
The error.msg
file contains only one-line error messages.
Following are several examples of using the verr
utility to look up an error using a number or name. The entry in bold is the command statement and following are the lines returned.
verr 2903
====== SEARCHING FOR '2903' ======
2903, SM_LOCK_TIMEDOUT: Lock wait Timed out
verr SCAP_PREP_CLS
====== SEARCHING FOR 'SCAP_PREP_CLS' ======
8127, SCAP_PREP_CLS: Cannot add signature to class object,
for class %s
We were unable to mark the class object as dirty,
so we could not add the class signature to it.
This will prevent the schema signature assertion at runtime.
Note that for the second example, explanatory information was available.
If you abbreviate the err_name
argument, all messages matching the partial name will be printed.
Example:
verr OUT_OF
====== SEARCHING FOR 'OUT_OF' ======
1022, SM_E_OUT_OF_CLASS_CB_SPACE: Out of class CB space
1033, SM_E_OUT_OF_CSR_SPACE: Out of cursor space
1083, SM_E_OUT_OF_VOL_SPACE: all volumes exhausted
8816, EVPP_OUT_OF_MEMORY: out of memory in parser
The vpp program ran out of memory. Adding more swap space
could help, as could removing some processes from the
machine.
Using "stopdb" on a Versant database can also help a lot.
verrindx
Any time that you define your own error message and alter the file error.msg
, you must re-index it. Do this by running the VERSANT verrindx
utility. This utility takes no command line arguments and prints nothing while running.
vexport -d dbname [options]
Export instances of a database named dbname
to an ASCII file in STEP physical file format.
For a remote database, append the node name to the database name using the syntax database@node
.
We recommend that you use vstream
rather than vexport
, because vstream
has additional functionality and better memory usage.
Options are:
-o file
stdout
.
-s nInstances
class [class [...]]
If no classes are specified, the entire database will be exported. All objects of the specified classes will be exported.
vexport
has the following limitations:
Links to objects in other databases will be set to NULL
.
You may encounter memory problems when exporting or importing extremely large databases.
You may encounter problems handling instances whose classes have gone through schema evolution
You may encounter problems with archived objects.
You may encounter problems with versioned objects.
See also vstream
and vimport
.
vgc2 -d dbname [-y] [-n] [-q] [-i] [-m [-t dir]] \
[cls1 cls2...] [loid1 loid2...]
The mandatory parameter is:
-d dbname
-y
-n
If neither -y
nor -n
are specified, the program will ask the user before deleting garbage.
-q
Without the -q
option, the command will print a summary of how many garbage instances were found, on a class by class basis.
-i
loid
of each instance.
-m
This option can be used only on operating systems that support a mmap()
system call.
If this option is used, four temporary files will be created with file names of the form _gcXXXXX.tN
, where XXXXX
is a five digit number and N
is a number from 1
to 4
. If vgc2
terminates abnormally, these temporary files may not be removed automatically, in which case you should remove them manually.
-t dir
-m
option is used, you can use this option to specify the directory in which the temporary storage files are to be created. The default is the current working directory.
cls
The class name must not start with a digit [0-9
]. If no root class is specified, this utility will remove all objects in the database except system objects.
loid
Specify the root object with its logical object identifier (loid), which is a dotted decimal triple.
vgc2
.Usage
Garbage objects are objects which are not system objects and are not reachable by following links from some set of root objects. Of course, all objects are potentially visible by doing a select query.
Database root objects are objects named by loid
on the command line and all instances of database root classes.
Database root classes are those classes named on the command line.
All database roots objects are reachable. If an object is reachable, all objects to which it has links are reachable.
If a versioned object is reachable, its generic instance and all of its versions are reachable.
If a generic instance is reachable, all of its versions are reachable.
System objects are defined to be instances of any class whose name begins with o_
and also instances of the following classes:
class, attribute, method, lo_class, pl_class, char, loid_db, db_dir, dba_uid, tombstone_sysclass
The best way to use the garbage collector is to define one or more classes to be database root classes. Make sure that all the objects you want to keep are installed in some instance of one of the database root's classes.
In the Smalltalk interface, the class VNamespace
is defined for this purpose. If all interesting Smalltalk database objects are reachable from VNamespace
, you can collect garbage with this shell command:
vgc2 -d databaseName VNamespace
If several different sets of objects are stored in the same database, and each set of objects has different database root classes and objects, you must use the union of all these database root classes and objects.
Objects created by different language interfaces may be used and garbage collected together in the same database as long as this union policy is used.
For example, if a database has both C++ and Smalltalk objects, and the Smalltalk objects use the VNamespace
convention for root objects, but the C++ objects should not be garbage collected, you can use this command:
vgc2 -d databaseName VNamespace PObject
All C++ objects derive from PObject
, and thus will be considered roots, and will therefore not be deleted.
Limitations
Single database Only a single database is garbage collected. If objects in the database are reachable but only via objects in another database, they will be thought to be garbage.
Default long transaction The garbage collector runs in the default long transaction and does not know about any objects not visible to and available to the default long transaction.
Only program running When the garbage collector is running, it must be the only program accessing the database. The requirement that the garbage collector be the only program accessing the database is not enforced. However, it is thought to be safe for other programs that only read non-garbage objects to be connected to the database.
Memory limitations If you do not use the -m
option, a database is very large, and the object relationships in the database are very complex, then garbage collection may fail with an "out
of
heap
" error message. This means that you have run out of system swap space. Before using garbage collection, you should maximize available swap space.
Safety
The garbage collector is inherently dangerous to use, as are commands such as dropinst
, dropclass
, and removedb
.
In particular, if you name no roots on the command line, the garbage collector will remove all objects in the database except system objects.
For example, the following deletes all objects in the database mydb
that have the root class RootClass
:
$ vgc2 -d mydb -y RootClass
Delete 4 instances of class 'VNamespace'
Delete 4 instances of class 'Array'
Delete 4992 instances of class 'Association'
Delete 4996 instances of class 'VGarbagePrimeNumber'
Delete 26669 instances of class 'VGarbagePrimeLink'
DELETING GARBAGE.
$
A good idea would be for each site to write a shell script that will invoke the garbage collector with a fixed set of arguments. Then users would never call vgc2
directly, but rather only with the script, which would always provide the right arguments.
Examples
The following example summarizes what garbage would be found in the database mydb
if only instances of the Smalltalk/VERSANT VNamespace
class were considered database root objects. Because the -n
option is given, no objects will be deleted.
$ vgc2 -d mydb -n Namespace
Delete 3 instances of class 'Array'
Delete 2994 instances of class 'Association'
Delete 2997 instances of class 'TestNode'
Delete 15168 instances of class 'TestLink'
Garbage not deleted.
The following example considers the object whose loid
is the dotted triple 65.0.1234
and all instances of VNamespace
to be database root objects. Because neither -n
nor -y
are given as command arguments, you are asked whether the garbage is actually to be deleted.
$ vgc2 -d mydb 65.0.1234 Namespace
Delete 3 instances of class 'Array'
Delete 2994 instances of class 'Association'
Delete 2997 instances of class 'TestNode'
Delete 15168 instances of class 'TestLink'
Okay to delete garbage ? y
DELETING GARBAGE.
The following example uses the -i
option, so the garbage objects are listed individually by loid
after they are summarized by class. Because the -y
option is specified, they are deleted without asking.
$ vgc2 -d mydb -y -i MyRootClass
Delete 3 instances of class 'Manager'
Delete instance '[65.0.2094]'
Delete instance '[65.0.2095]'
Delete instance '[65.0.2096]'
Delete 4 instances of class 'VicePresident'
Delete instance '[65.0.2075]'
Delete instance '[65.0.9143]'
Delete instance '[65.0.16199]'
Delete instance '[65.0.26631]'
DELETING GARBAGE.
The following examples show usage and output of vgc2
.
$ vgc2 -d mydb -n MyRootClass
There are 180 garbage objects to be deleted.
Garbage not deleted.
$ vgc2 -d mydb -n -m -t /tmp MyRootClass
There are 180 garbage objects to be deleted.
Garbage not deleted.
$ vgc2 -d mydb -y -m -t /tmp MyRootClass
There are 180 garbage objects to be deleted.
DELETING GARBAGE.
$ vgc2 -d mydb -y -m -t /tmp MyRootClass
There is no garbage to be deleted.
vimport -d dbname [option]
Import instances from an ASCII file in STEP physical file format and place them into the database dbname
.
We recommend that you use vstream
rather than vexport
, because vstream
has additional functionality and better memory usage.
The option
is:
file [file [...]]
stdin
.
vstream
, vexport
and your Release Notes (for limitations on the use of vimport
).
vstats [ options ] [ command ]
Start the Statistics Tool.
The vstats
utility can collect and view statistics that will tell you where time is being spent by your application process and the server process for each connected database.
For an overview of statistics collection and stastics collection usage notes, see the VERSANT Database Fundamentals Manual.
command
parameter.List statistics
-summary
If this alternative is given, all other parameters are ignored.
-stats expr_list
The specified statistics in expr_list
will be read from a file or from a direct connection per the -filename
, -stdin
, and -database
parameters.
Statistic names must be specified as shown in the VERSANT Database Fundamentals Manual, except without the STAT_
prefix and transposed to lower case. To see the available names online, use the -summary
command.
For connection and database statistics (those with the prefixes be_
and db_
), you must also use a database name since the same statistics may be available for multiple databases. The general syntax is:
"statistic_name database_name"
For example:
vstats -stats "be_real_time groupdb"
vstats -stats se_reads + se_writes
+
, -
, *
, /
, (
, and )
. You can also use the following special functions:
delta
The difference between an expression's current value and it's next most recent value.
min
The minimum value of an expression over the vstats
run.
max
The maximum value of an expression over the vstats
run.
avg
The average value of an expression over the vstats
run.
For example to view traffic to and from a database named db1
in objects per second, the following command could be used:
vstats -stats "delta ( db_obj_sent db1 + \
db_obj_received db1 ) / delta be_real_time db1"
-on [ stats_list ]
If no statistic names are specified, all connection and database statistics will be turned on.
If a list of statistic names are specified in stats_list
, collection will be turned on only for the specified statistics. Normally, you will want to specify only connection statistics (with a be_
prefix) and database statistics (with a db_prefix)
.
Statistic names must be specified as shown in the section "Function and Statistic Names", except without the STAT_
prefix and transposed to lower case. To see the available names online, use the -summary
command.
When using -on
, you must specify a database with the -database
option. This means that in a list of statistic names, you do not use "stat_name
dbname"
syntax as in the -stats
command.
When using -on
, you may also specify a connection with the -id
option. If a connection is not specified, connection statistics will be turned on for all connections to the datbase at the time vstats
is invoked. If additional connections are made at a later time, you must invoke vstats
with -on
again to turn automatic profiling on for the new connections.
The on state is not persistent. If a database is stopped and restarted, automatic profiling reverts to the default state of off.
Some statistics, particularly those that measure time intervals, are expensive to collect. Accordingly, you should turn on as few statistics as possible when performance is an issue. Similarly, when collection of a statistic is no longer necessary, you should turn collection off. Turning a statistic off resets its value to 0
.
-off [ stats_list
]
This command can be used only by the dba user who created the databases being monitored.
If no statistic names are specified, all statistics will be turned off. If a list of statistic names are specified in stats_list
, collection will be turned off only for the specified statistics.
Statistic names must be specified as shown in the section "Function and Statistic Names", except without the STAT_
prefix and transposed to lower case. To see the available names online, use the -summary
command.
When using -off
, you must specify a collection database with the -database
option.
You may also specify a connection with the -id
option. If a connection is not specified, connection statistics will be turned off for all connections to the datbase at the time vstats
is invoked. If additional connections are made at a later time, you must invoke vstats
with -off
again to turn automatic profiling off for the new connections.
If a database is stopped and restarted, automatic profiling reverts to the default state of off.
-connections
-database
option, print the connection identifier, username, session name, long transaction identifier, server process identifier, application process identifier, and protocol information.
This command is useful to get a connection identifier that can be used with the -id
option.
-locks
-database
option, print the logical object identifier for the locked object, the external lock mode, the internal lock mode, the transaction identifier, whether the object has a pending lock request, and whether the lock is a short or persistent lock.
-transactions
-database
option, print the transaction identifier, number of locks held by the transaction, the connection identifier associated with the transaction, and whether the transaction is a short or long transaction.
vstats
is all database connections in existence at the time it is invoked. If a database connection is made after vstats
is invoked, statistics collection for that connection will be on or off per the default set in the stat
database configuration parameter.
The vstats
utility will send statistics to stdout
. To send statistics to a file, you must collect statistics with an application and set the VERSANT_STAT_FILE
environment variable to point to a file name.
vstats
with various command options.
vstats -d group -connections
Connection ID to database "group":
Connection ID = 417
User Name = "george"
Session Name = "vstats -connections"
Long Transaction = "10432.0.2052"
Server Process = "gamehendge":417
Client Process = "gamehendge":417
Protocol = TCP/IP
Server Port = 192.70.173.25:5019
Client Port = 192.70.173.25:4049
vstats -d group -transactions
Transactions in database "group":
Transaction ID = "10432.0.3076"
Name = "vstats -transactions"
Lock Count = 2
Connection ID = 418
Flags = "Short"
vstats -d group -locks
Locks in database "group":
Object = "10432.0.1027"
External Mode = "Intention Write"
Internal Mode = "Intention Write"
Transaction ID = "10432.0.4100"
Flags = "Running, Transient"
Object = "10432.0.2052"
External Mode = "Read"
Internal Mode = "Read"
Transaction ID = "10432.0.4100"
Flags = "Running, Transient"
-vstats
command, you can view them either from a file or from stdin
. Following are options for the source of the statistics to be viewed. If none of these options are specified, the file specified in the VERSANT_STAT_FILE
environment variable will be used. If VERSANT_STAT_FILE
is not set, stdin
will be used. The viewing options are mutually exclusive.Viewing options are:
Source file
-filename filename
-stdin
stdin
.
The -stdin
option can be used to view a profile file as it is being generated. For example:
tail +0f file | vstats -stdin -stats se_reads
-stdin
to read a file, you will probably want to use the VERSANT_STAT_FLUSH
environment varible.
-database dbname
-id connection-id
-database
option.
By default the connection associated with the vstats
process is used. For this reason, you should use the -id
option if you are using -database
and have specified any connection statistics (otherwise, you will just get the statistics for the vstats
connection).
You can use the -connections
command with the -database
option to get connection identifiers.
-filename
, -stdin
, and -database
.
To view statistics with a direct connection using the -database
option, you must first enable those statistics which you are interested in viewing using the -on
command. You can then view them with the -stats
command.
-stats
command, you can pick one or more of the following options to specify the information to be displayed.No information
-noinfo
-period seconds
-filename
or from stdin
specified with -stdin
, the default pause is 0
seconds. When reading directly from a database specified with -database
, the default pause is 5
seconds.
-iterations iter
0
means to output all readings in the file or, in the case of direct reading from a database, to take readings indefinitely.
vstats
will read a configuration file in which derived statistics can be pre-defined and named. On UNIX installations, the name of the file is .vstatsrc
. On personal computer installations, the name of the file is vstatsrc
.
A system-wide vstatsrc
file in the VERSANT lib
directory will always be read. If a file named .vstatsrc
exists in your UNIX home directory, it will also be read. These files can contain comments beginning with #
and commands to define new derived statistics. See the "Directories and Files" chapter for information about .vstatsrc
and vstatsrc
.
-stats
command to read a file or view a direct connection, you will see a header and a listing.In the header, the names of the statistics being analyzed will be printed, along with explanations of each statistic.
In the listing, the statistics values themselves will be presented in columns. By default, there will be an additional column indicating a function name or comment associated with the statistics. If the statistics are coming from a file, some additional information may also be provided. If a statistic is undefined, a dash will be printed in place of a value until that statistic becomes defined.
The following is example of output when the -stats
command is used. Note the misspelling of the entry "se_dirtyy
."
vstats
-stats
se
_objs
"delta
se
_objs
" se
_dirtyy
"db
_net
_reads
group2
"
VERSANT Utility VSTATS Version 5.0.4
Copyright (c) 1989-1996 VERSANT Object Technology
0 = se_objs
1 = delta se_objs
2 = se_dirtyy
3 = db_net_reads group2
0 1 2 3
===== ===== ===== =====
109 - - -
109 0 - - o_xact(group)
140 31 - -
58 -92 - - o_xact(group)
219 161 - -
58 -161 - - o_xact(group)
In the above example, Column 0
shows values for the se_objs
statistic and Column 1
uses the delta function to show the difference in this value from reading to reading. Note that the first entry in Column 1
is a dash, since delta
se_objs
is undefined until two readings are available.
Columns 2
and 3
are undefined all the way down. In the case of Column 2
, this is because the statistic se_dirtyy
is undefined due to a misspelling.
In the case of Column 3
, entries are undefined, because no statistics were ever collected for a database called group2
. There are many possible reasons for this. For example, perhaps no connection was ever made to group2
, or the be_net_reads
statistic was never turned on, or the VERSANT_STAT_DBS
environment variable was used to disable collection of statistics for group2
.
The last column shows some additional information recorded by the automatic collection mechanism. Each two lines of output show statistics recorded at the very beginning and very end of a function call to the database server process. On the second line of each of these pairs, the name of the function for which the statistics were recorded is shown, as well as a list of databases from which backend and database statistics were collected. This information column is not available when the direct connection model is being used or when a time interval limiting automatic collection is specified, for example, by using the VERSANT_STAT_TIME
environment variable. The display of the information column can be suppressed by using the -noinfo
option.
The following sample output is for a case where detailed statistics were collected for a function named amalgamateObjs()
, which selects objects from two databases, reads the objects into memory, and performs a commit. For this case, assume that amalgamateObjs()
has been defined to invoke the following functions:
function invoked
output occurs..
1. o_autostatsenter()
on entry into amalgamateObjs()
2. o_select()
on entry and exit
3. o_greadobjs()
on entry and exit
4. o_autostatswrite() on invocation: a comment is printed
5. o_select()
on entry and exit
6. o_greadobjs()
on entry and exit
7. o_autostatswrite() on invocation: a comment is printed
8. o_autostatswrite() on invocation: a comment is printed
9. o_xact()
on entry and exit
10. o_autostatswrite() on invocation: a comment is printed
11. o_autostatsexit()
on exit from amalgamateObjs()
In this case, vstats
was invoked with the following:
% vstats -stats fe_real_time "db_net_reads db1" "db_net_reads db2"
After the invocation of vstats
, the application was run and called amalgamateObjs()
, which caused the following output. Column 1
shows elapsed time. Columns 2
and 3
show the number of object reads.The ">
" symbols in the info
column show the nesting of function calls. The annotation comments in italics would not appear in the actual output and have been added here for explanation.
VERSANT Utility VSTATS Version 5.0.5
Copyright (c) 1989-1996 VERSANT Object Technology
Statistics collected: Thu Jun 9 12:57:17 PDT 1996
fe_real_time = Seconds elapsed
db_net_reads = Reads from frontend
Column 1 = fe_real_time
Column 2 = db_net_reads db1
Column 3 = db_net_reads db2
1 2 3 info
=== === === ====
0.451 0 0 <- o_autostatsenter()
0.603 0 0 > <- o_select() entry
1.452 1 0 >o_select(db1) <- o_select() exit
1.612 1 0 > <- o_greadobjs() entry
3.123 3 0 >o_greadobjs(db1) <- o_greadobjs() exit
3.523 3 0 >got objs from db1 <- o_autostatswrite()
3.602 3 0 > <- o_select() entry
4.124 3 1 >o_select(db2) <- o_select() exit
4.298 3 1 > <- o_greadobjs() entry
5.011 3 3 >o_greadobjs(db2) <- o_greadobjs() exit
5.128 3 3 >got objs from db2 <- o_autostatswrite()
7.128 3 3 >done amalgamating <- o_autostatswrite()
7.278 3 3 > <- o_xact() entry
9.876 11 12 >o_xact(db1 db2) <- o_xact() exit
9.978 11 12 >committed changes <- o_autostatswrite()
10.011 0 0 amalgamateObjs(db1 db2) <- o_autostatsexit()
vstream mode
-d dbname
options
filename
Export the contents of a database to a file or import data from a file into a database.
Basic elements are:
|
Import or export the database. |
|
Name of database to receive or supply data. |
|
Import or export options. |
|
Name of file to receive or supply data. |
-i |
Stream data from a file to a database. |
-o |
Stream data from a database to a file. |
-i
vstream
reads in objects according to the exported data file and creates a new logical object identifier (loid) for each object. The -p
option allows you to use the same loid's as in the original database.
-o
vstream
iterates through all the objects in the database using cursors and streams the objects to a file. You can use the option -n
to set how many objects to read in each cursor fetch. The default setting limits the number of objects read in one cursor fetch to not exceed 80% of the cache size.
options
parameter are:
-p
The -p option ensures that logical object identifiers are not changed during the import process.
When importing data from a file to a database in multiple executions of vstream, you must use the -p option to preserve link relationships.
vstream -o -d db -c A data1.dat
vstream -o -d db -c B data2.dat
Then, later, if you import these two database files into a database with the following commands, the link relationships between A and B will not be set properly:
vstream -i -d db data1.dat
vstream -i -d db data2.dat
However, link relationships will be set properly with the following commands, because the logical object identifiers were preserved:
vstream i p d db data1.dat
vstream i p d db data2.dat
When exporting data, if logical object identifiers are to be preserved in a destination database, you should either filter by class name or set level filtering to 1. If level filtering is set to a number greater than 1, some duplication in the data stream might occur.
-t num
The default is one iteration, which means vstream releases memory after each cursor fetch or after reading each vstr from an exported data file.
-n num
-l level
The default is -1, which means read the entire object graph.
Specify a positive number to specify a particular number of levels to export. Setting a low level number, such as 1, will reduce memory requirements.
If you specify the option -1 (read entire graph), vstream
will write the morphology data to a file. The name of this file will be the same as your data file, except with the suffix ".morph
". This file must be present for vstream
to recreate the database.
-g
This option will improve performance if your object graph (the object tree) is not very complex.
-f
This option improves performance but requires a lot of memory.
-sa
The default is to export a database created by VisualWorks.
With only one exception, it does not matter what interface language you used to create objects: the objects you are exporting are interface independent.
However, if you have created objects with the VisualAge Smalltalk interface, you must specify the option sa
when exporting.
-c class
The default is to export the entire database.
If you specify the -c
option, vstream
will write morphology data to a file. The name of this file will be the same as your data file, except with the suffix ".morph
". This file must be present for vstream to recreate the database.
-q query
The query should have the general form "class attribute op value
"
where:
attribute is the attribute name,
op is one of {==
, <
, >
, <=
, >=
, !=}
, and
value is the attribute value which must be matched.
Place the query in quotes so that it is parsed as a single argument.
For example, streaming out a database with level 1 will export all the top level objects without following any further links; streaming with level 2 will force vstream
to export an object and any object that is linked to it. The internal morphology map will guarantee the consistency of the object graphs.
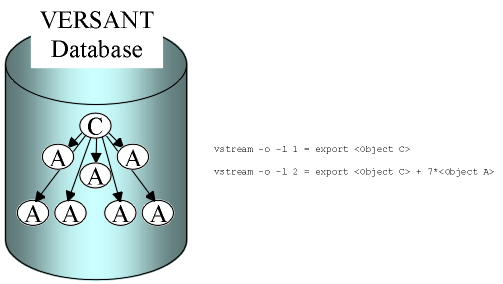
vstream
l
execution, all the object relationships (morphology) are preserved.
vstream
will try to synchronize the class definitions in the new database.The attributes in the stream schema and the database schema must be equal in name, type, and repetition factor for a successful match. The following schema synchronization rules apply:
Any object attributes present in the database schema and not present in the stream schema will not be overwritten.
Any object attributes present in both the database and stream schema is overwritten by the stream value. Attributes do not have to be in the same sequence.
Any linked attributes present in the stream but not in the database are still processed, but not reproduced. The subgraph of the link is still read in.
Any non-linked attributes present in the stream but not in the destination database are ignored.
vstream
across platforms. For example, you can stream out a HP database and then restore it on a Solaris machine.Data can be streamed across different versions of VERSANT. However, when you stream from a newer versioned database to a older versioned database, make sure that you don't have any version-related system class inside your new database that cannot be handled in the old database.
The only limitation on compatibility is the necessity to use the -sa
option when exporting objects created with VisualAge Smalltalk.
vstream
.
vstream
utility requires adequate random-access memory (RAM) and a swap file of sufficient size to hold the morphology data. You can estimate the operating system (OS) resources needed for the streaming process for a given database size.
vstream
probably does not have enough RAM.
Task
Manager>Processes>Page
Faults
; if it changes quickly, little progress is probably being made.
To export when memory is low, you may need to export only top-level objects by using the -l
1
option.
Example Following is an example that calculates resources based on Windows NT operating system requirements. The same equations are used to generate the resource requirements for a UNIX system.
The first step in estimating resources is to consider the object graph. The complexity of a given database object graph depends on the number of links between objects. In a worst case graph, each object is linked to every other object; in a best case graph, each object is isolated.
The table below lists object graph scenarios and the typical amount of RAM needed according to the number of objects, x
, in the graph.
Graph Complexity
Scenario |
RAM |
Swap File |
Worst Case |
40x |
40x |
Average Case |
20x |
40x |
Best Case |
4x |
40x |
In the worst case scenario, an average object has links to many other objects. This requires references to object information throughout the morphology map and during the streaming process. To achieve an acceptable level of performance, the required RAM size is approximately 40 times the number of objects plus the amount of RAM needed by the operating system.
In the average and best case scenarios, the object graph is relatively sparse and objects once processed are not referenced again. You still need the same swap file size, but the amount of RAM required is reduced to half or less. You can stream databases with smaller amounts of RAM if a typical object is referenced only a few times. Once these objects are swapped to disk by the operating system, it is less likely that they will be needed again. In the worst case scenario, however, many objects are frequently referenced and the insufficient available RAM can cause page faults.
The following formulas can be used to estimate the amount of operating system resources (RAM and swap file) needed:
Required RAM = (factor * ObjectCount) + OsRAM
Required swap file size = (40 * ObjectCount) + OsSwap
Elements of the above equations are:
|
Based on the morphology scenario (see the Graph Complexity table above). |
|
The approximate number of database objects. You can calculate number of database object by running the |
|
The operating system requirement for RAM. |
|
The operating system requirement for the swap file. |
Example Operating System Resource Requirements
Database size |
400 MB |
1 GB (4) |
Object count (1) |
2 million |
10 million |
Case |
worst |
Average to Best |
Factor |
40 |
15 (5) |
RAM (2) |
(40*2*106)+30MB = 110MB |
(15*107)+30 MB = 180MB |
Swap file (3) |
(40*2*106)+100MB = 180MB |
(40*107)+100MB = 500MB |
(1) Can be calculated using db2tty.
(2) Most databases will not require this maximum RAM amount. A test using a highly connected or worst case database of 380MB
ran perfectly with a 96MB
RAM limit. The Windows NT OS alone requires 30MB
. If additional applications are running, increase this value. Vary this value for other operating systems accordingly.
(3) The Windows NT OS alone requires 100MB
. Additional running applications will require an increased swap file size. Vary this value for other operating systems accordingly.
(4) With a database of this size, it is likely that the graph is sparse, so the user should consider this an average or best case scenario.
(5) Because this database is large and is between the suggested values for average (20) and best (4) cases, evaluate your database and choose this number.
On Windows NT operating system, the default stack limit is 1MB
; on Solaris it is 8M
.
For an object graph whose level exceeds 1000
, we recommend that you use level filtering.
Usually importing is faster than exporting. It takes about 4.5 hours to stream out a 400 MB database with level 1 filtering and 3 hours to stream it in on a sparc Ultra Server.
vstream
utility replaces the previous utilities vimport
and vimport
. The vstream
has additional functionality and better memory usage.
vtape
On NT, you can use the vtape.exe
utilty to view and set SCSI tape drive and media parameters.
Following is a screen shot showing the appearance of the vtape
screen.
The vtape
utility is meant to facilitate your use of the vbackup
utility.
Tape device names for NT tape drives are of the form \\.\TAPE0
\\.\TAPEn.
The initial tape drive is \\.\TAPE0
by default. The vtape
utility reads and displays the default tape drive's parameters.
To use vtape
, first invoke it from a command line. Then, to read parameters, in the dialogue box, enter the tape drive name and press the "Get
Tape
parameters
" button. The parameters for \\.\TAPE
will appear.
If you wish to set tape drive parameters, press the "Set Tape parameters
" button. You will then be able to toggle "Hardware
data
compression
" on or off and change the "Current
Block
Size
". If you change the block size setting, make sure that the new value falls between the minimum and maximum block size values for the current tape drive.
The vtape
utility will also display any VERSANT databases on the current tape. To view this list, press the "Get
Database
List
" button.
See also vbackup
.
This online documentation is confidential and proprietary to Versant Corporation and is licensed to you, or to your organization, pursuant to the terms of an agreement between you and Versant that restricts the use of this documentation. Please refer to the agreement for more information or call Versant at 510-789-1500 with any questions.